DIY Montessori Button Frame for Dressing Practice
Watching your little one try to button their own kurta or shirt is a moment filled with both joy and a tiny bit of impatience, isn't it? In many Indian homes, where grandparents often lovingly help dress children, fostering this independence from a young age can feel a bit challenging. But what if there was a simple, engaging way to help your child master these crucial life skills? Today, we're going to explore how to make a Montessori button frame right at home, a wonderful tool for practical life development.
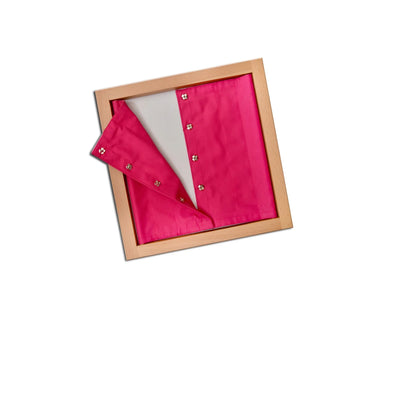
A Montessori button frame is a beautifully simple, self-correcting educational tool designed to help children practice the specific skill of buttoning and unbuttoning. This works because it isolates the task, allowing the child to focus solely on the fine motor movement and coordination required, without the pressure of dressing themselves. Parents can easily introduce this activity as part of their Montessori learning activities at home, fostering concentration and dexterity in a playful manner.
Why Practical Life Activities Matter for Indian Children
Maria Montessori firmly believed that children thrive when given opportunities for purposeful work. In our bustling Indian households, where children often observe elders performing daily chores, involving them in practical life activities like dressing, pouring water, or sweeping can be incredibly empowering. These tasks aren't just about chores; they build self-confidence, coordination, and a sense of belonging within the family unit, preparing them for more complex learning later on. Exploring practical life Montessori materials offers a structured way to introduce these vital skills.
DIY Button Frame: A Step-by-Step Guide for Indian Homes
Gathering Your Materials – Locally Sourced & Sustainable
One of the beauties of Montessori at home, especially in India, is using what's already around us. For your DIY button frame, you'll need two sturdy pieces of cardboard (perhaps from an old delivery box or a saree box) or thin plywood, roughly 12x12 inches each. You'll also need two fabric pieces of contrasting colours, about 14x12 inches each – old cotton dupattas, an unused pillowcase, or even a sturdy dish towel work perfectly. A set of medium-sized buttons (about 5-7), needle and thread, fabric glue, and scissors complete your kit.
Constructing Your Button Frame
First, take one fabric piece and fold it in half lengthwise, creating two 14x6 inch sections. On one edge of this folded fabric, mark and cut out five to seven evenly spaced buttonholes. On the other fabric piece, sew the corresponding buttons in place. Ensure the buttonholes and buttons align perfectly when the two fabric pieces are placed side by side. This precision is key for the child's success.
Next, carefully glue or sew one long edge of each fabric piece onto the inner long edge of your cardboard/plywood frame. Imagine the two fabric pieces meeting in the middle of the frame, where the buttons and buttonholes will align. Securely attach the fabric to the cardboard, ensuring there's enough slack for the child to manipulate the buttons easily. The aim is to create a sturdy yet flexible structure that isolates the buttoning action.
Presenting the Button Frame to Your Child
When introducing the Montessori button frame, sit beside your child and slowly demonstrate the process yourself, without speaking much. Show them how to grasp the button, push it through the buttonhole, and pull it out. Repeat this a few times, then invite them to try. Remember, the goal is not perfection, but engagement and developing their fine motor skills. Activities like this are foundational for other educational toys for toddlers that require dexterity.
Benefits Beyond Buttoning: Child Development in India
Beyond simply learning to button, this activity significantly contributes to overall child development in India. It refines pincer grip, strengthens hand-eye coordination, and builds concentration – skills vital for writing, drawing, and daily tasks. The independence gained from mastering such a practical skill also boosts a child's self-esteem, preparing them for school and life’s bigger challenges. It's a testament to Maria Montessori's profound understanding of how children learn best through self-directed activity.
Adapting for Younger Children or Small Apartments
For younger children, you might start with larger buttons and simpler closures, perhaps a zipper or buckle frame first. If you live in a small apartment, the beauty of a button frame is its compact size; it can be stored easily on a low shelf or in a "work basket." In a joint family setting, older siblings or even grandparents can gently guide the child, making it a beautiful intergenerational learning experience.
Key Takeaways for Your Montessori Journey at Home
- A DIY Montessori button frame is an accessible and effective practical life material.
- It helps children develop crucial fine motor skills, hand-eye coordination, and independence.
- Use readily available Indian materials like cardboard, old fabric, and common buttons.
- Present the activity with a silent demonstration, allowing the child to explore at their own pace.
- Practical life activities foster concentration, self-esteem, and a sense of purpose in children.
- Adapt the complexity of the frame based on your child's age and developmental stage.
Frequently Asked Questions About Button Frames
What age is appropriate for a Montessori button frame?
Children typically show readiness for buttoning activities between 2.5 and 3.5 years of age. Observe your child's interest in buttons and their developing fine motor skills to determine the best time to introduce the frame.
How often should my child use the button frame?
Allow your child to engage with the button frame as often as they show interest. Montessori encourages self-directed learning, so there's no fixed schedule. Offer it as an available activity in their prepared environment.
What if my child gets frustrated with the button frame?
If frustration arises, gently suggest putting the activity aside for a while. Avoid pushing them. Sometimes, a simpler practical life activity or a break is all that's needed. You can reintroduce it another day.
Can I make other DIY dressing frames?
Absolutely! Once you master the button frame, you can apply the same principles to create frames for zippers, buckles, snaps, and even lacing. These all contribute to comprehensive dressing practice and independence.
Creating a Montessori button frame at home is a rewarding project that truly supports your child's journey towards independence. At SkilloToys.com, we believe in empowering parents with resources and high-quality Montessori learning materials that nurture a child's natural curiosity and capabilities. Happy crafting and happy learning!