DIY Sandpaper Letters: A Fun Montessori Activity at Home
Namaste, dear parents! In our bustling Indian homes, where every corner holds a story and every activity is an opportunity for connection, fostering a love for learning comes naturally. If you're exploring Montessori principles at home, you know the magic of hands-on, sensory-rich experiences. Today, let's dive into making your very own sandpaper letters – a classic Montessori material that beautifully introduces preschoolers to the shapes and sounds of alphabets.
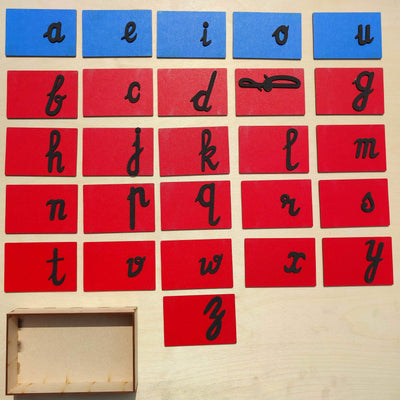
Montessori sandpaper letters are tactile teaching tools designed to engage a child's sense of touch, sight, and hearing simultaneously. Each card features a letter, typically in a contrasting colour, with its outline made from sandpaper or a similar textured material. This works because it allows children to trace the letter with their fingers, feeling its shape before they can even hold a pencil, thereby preparing them for writing and reading. Parents can easily create these at home, providing a wonderful, low-cost way to support their child's language development.
Why Sandpaper Letters are a Montessori Essential for Early Literacy
Dr. Maria Montessori observed that children learn best by doing, by touching, and by exploring their environment. Sandpaper letters perfectly embody this philosophy. They offer a multi-sensory approach to literacy, which is incredibly effective for young learners, especially in the crucial years of child development in India. By feeling the letter, children build a muscular memory of its form, laying a strong foundation for both reading and writing.
This hands-on method helps children internalise letter shapes and their corresponding sounds (phonics) without pressure. It’s an engaging way to introduce the alphabet, fostering independence and concentration – key pillars of Montessori learning. For parents seeking effective Montessori learning activities at home, this is a must-try.
Gathering Your Materials: A Desi DIY Approach
One of the beautiful things about Montessori at home, India style, is adapting with what's readily available. You don't need fancy imports to create impactful learning tools. Here’s what you’ll need to make your own sandpaper letters:
- Cardboard: Repurpose old Amazon delivery boxes, sweet boxes from festivals, or even thick chart paper. Aim for sturdy pieces, roughly 4x6 inches or postcard size.
- Sandpaper: Fine-grit sandpaper (around 100-150 grit) is ideal. You can find this easily at any local hardware store (the 'paint ki dukaan') or ask your neighbourhood carpenter. A small sheet will go a long way.
- Adhesive: Strong Fevicol or any similar white craft glue will work perfectly.
- Pencil & Scissors/Cutter: For tracing and cutting.
- Coloured Paper/Paint: Traditionally, Montessori uses red for vowels and blue/green for consonants. This helps children visually distinguish them. You can use coloured craft paper, paint, or even sketch pens.
While DIY is wonderful, if time is short or you prefer a professional finish, you can always explore high-quality sandpaper letters available on SkilloToys.com that are ready for immediate use.
Step-by-Step Guide to Crafting Your Own Sandpaper Letters
Step 1: Prepare Your Base Cards
Cut your cardboard into uniform rectangles. Consistency in size helps maintain order and aesthetic appeal for the child. You'll need one card for each letter of the alphabet. If you're planning to introduce Indian language scripts, prepare additional cards.
Step 2: Trace and Cut Your Letters
Using a bold, clear font (like sans-serif), trace each lowercase letter onto the rough side of the sandpaper. Remember, Montessori introduces lowercase letters first as they appear most frequently in reading. Carefully cut out each sandpaper letter. Take your time to ensure clean edges.
Step 3: Adhere the Sandpaper Letters
Apply a thin, even layer of glue to the back of each sandpaper letter. Carefully place and press each letter onto the centre of a cardboard card. Ensure the letter is firmly attached and smooth out any bubbles or wrinkles. The rough texture should be prominent and easily felt.
Step 4: Colour-Code for Clarity
Once the glue is dry, colour the background of the cards. If you're following the traditional Montessori approach, use red for all vowels (a, e, i, o, u) and green or blue for all consonants. This visual cue helps children understand the different categories of letters and is an important part of Montessori language materials.
Step 5: Let Them Dry and Inspect
Allow all your homemade sandpaper letters to dry completely. This is crucial to prevent warping and ensure durability. Once dry, run your finger over each letter to ensure the sandpaper is securely attached and the texture is clear and distinct. Your DIY sandpaper letters are now ready for learning!
Bringing Sandpaper Letters to Life: Activities at Home
Introducing the sandpaper letters to your child should be a gentle, inviting process. Present one or two letters at a time, starting with letters that are phonetically distinct and easy to trace (e.g., 'm', 's', 'a'). Use the classic Montessori 'three-period lesson':
- Naming: "This is 'm'." (Trace the letter for them).
- Recognition: "Show me 'm'." (Ask them to point to or trace 'm').
- Recall: "What is this?" (Encourage them to name the letter after tracing).
Remember, the focus is on the sound the letter makes, not just its name. Say 'mmmm' for 'm' rather than 'em'. This approach builds a strong foundation for early reading and writing skills, crucial for educational toys for toddlers.
Tips for Indian Parents Practising Montessori at Home
- Involve the Family: Grandparents, aunts, and uncles can be wonderful facilitators. Their stories and gentle guidance can enrich the learning experience.
- Small Spaces, Big Learning: Even in compact apartments, a dedicated mat or a small tray can define a 'work' area for these letters.
- Patience and Observation: Every child's learning pace is unique. Observe their interest, follow their lead, and never force an activity.
- Multilingual Approach: If your family speaks multiple Indian languages, consider making sandpaper letters for those scripts too! This fosters a deep connection to their heritage and language.
Key Takeaways
- DIY sandpaper letters are an effective, budget-friendly Montessori tool for early literacy.
- They engage multiple senses, building a strong foundation for reading and writing.
- Materials are easily found in Indian homes and local stores.
- The process involves preparing cards, tracing/cutting sandpaper letters, gluing, and colour-coding.
- Introduction should be gentle, following the three-period lesson, focusing on letter sounds.
- Adapt to your home environment and child's interests, involving family and multilingualism.
FAQ: Frequently Asked Questions
What age is best to introduce sandpaper letters?
Typically, children around 2.5 to 3.5 years old are ready for sandpaper letters, once they show an interest in sounds and shapes. Observe your child's readiness rather than strictly following an age.
Can I make sandpaper letters for Indian languages?
Absolutely! Making sandpaper letters for Hindi, Tamil, Kannada, or any other Indian language is a fantastic idea. It strengthens their connection to their mother tongue and promotes multilingual literacy from an early age.
How often should my child use sandpaper letters?
Short, focused sessions (5-10 minutes) a few times a week are often more effective than long, infrequent ones. Let your child initiate the activity, and stop when their interest wanes.
What if my child isn't interested in the letters?
Don't force it. Put the letters away for a few weeks and reintroduce them later. Sometimes, linking them to a story or a game can spark interest. Remember, learning should always be joyful.
Are DIY sandpaper letters as effective as store-bought ones?
Yes, homemade sandpaper letters can be just as effective! The core principle lies in the tactile experience. As long as they are well-made, durable, and clearly represent the letters, they serve their purpose beautifully.
Creating these simple yet profound tools at home is more than just a craft project; it's an act of love that prepares your little one for a lifetime of learning. At SkilloToys.com, we believe in empowering parents with resources and high-quality Montessori learning materials to support every child's unique journey. Happy crafting and happy learning!