Make a Montessori Button Frame for Dressing Practice
Hello, wonderful parents! In our busy lives, seeing our children grow into capable, independent individuals is a joy like no other. Imagine your little one confidently buttoning their own kurta or shirt, ready for the day! That sense of accomplishment is priceless, and it's a core value in Montessori education. Today, we're going to explore how you can foster this independence right at home by making a simple yet incredibly effective material: a Montessori button frame.
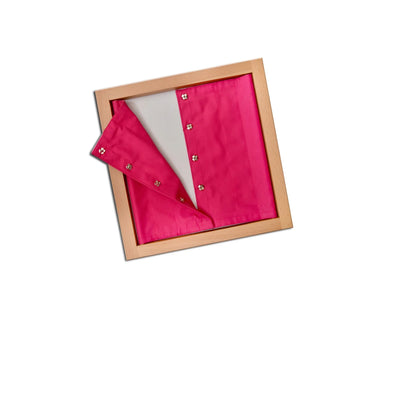
A Montessori button frame is a practical life material designed to help young children, typically aged 2.5 to 4 years, develop the fine motor skills and concentration needed for dressing themselves. This works because it isolates the skill of buttoning, allowing the child to focus purely on the precise movements without the distraction of a full garment. Parents can introduce this frame as a foundational step before their child attempts buttons on their own clothes, building confidence along the way.
Why a Button Frame is Perfect for Indian Homes
In the vibrant tapestry of Indian family life, children are often surrounded by doting grandparents and extended family members eager to help. While this support is wonderful, providing opportunities for children to do things for themselves is crucial for their development. A button frame empowers them to learn self-care skills, aligning perfectly with the Montessori philosophy of 'help me do it myself'. This is a fantastic example of a practical life activity that supports Montessori at home India.
Many Indian clothes, from traditional shirts and kurtas to frocks, feature buttons, making this a highly relevant skill. Mastering buttoning not only boosts independence but also refines hand-eye coordination and concentration, essential components of child development India. It's a quiet, engaging activity that fits well into any home, whether you live in a sprawling joint family home or a cozy city apartment.
Gathering Your Materials: A Trip to the Local Market
One of the beauties of Montessori DIY is using readily available, local materials. Instead of buying expensive items, a trip to your neighbourhood fabric store or a stationery shop can provide everything you need. This makes it an accessible and sustainable way to provide educational toys for toddlers.
What You'll Need:
- Two sturdy wooden frames (approx. 12x12 inches each, or old photo frames without glass)
- Two pieces of thick, non-stretchy fabric (like canvas, denim, or even old bedsheets), each 12x12 inches
- Matching thread
- Four buttons (around 1 inch in diameter, choose ones easy for small hands to grasp)
- Fabric scissors
- Sewing needle or sewing machine
- Fabric glue or strong wood adhesive
- Measuring tape or ruler
Step-by-Step: Crafting Your Own Montessori Button Frame
Creating this practical life tool is a rewarding process. Take your time, and enjoy making something special for your child's learning journey. Remember, the goal is functionality and clarity for the child, not perfection.
Preparing the Fabric Panels:
Take your two fabric pieces. On one piece, mark and cut four buttonholes vertically down the center, spaced evenly. Ensure each buttonhole is slightly larger than your chosen buttons. On the second fabric piece, mark where your buttons will be sewn, aligning them perfectly with the buttonholes on the first piece when laid on top.
Attaching the Buttons and Buttonholes:
Neatly sew the buttons onto the marked positions on the second fabric piece. For the first fabric piece, reinforce the edges of the buttonholes with tight, neat stitching, either by hand or machine, to prevent fraying. Precision here makes the activity easier for little fingers.
Assembling the Frame:
Attach each fabric piece to a separate wooden frame. You can staple, tack, or use strong fabric glue to secure the edges of the fabric to the back of each frame. Ensure the fabric is taut and smooth. Finally, hinge the two wooden frames together along one side using small hinges or strong fabric strips, so they open and close like a book. When closed, the buttons on one panel should align with the buttonholes on the other.
Bringing the Button Frame to Life: Presentation and Practice
Introducing the button frame to your child is a gentle process. Sit beside them, show them how to use it slowly and deliberately, without speaking too much. Focus on the actions: holding the fabric, pushing the button through, and pulling it out. Let them observe and then invite them to try. This hands-on method is key to Montessori learning activities.
Children naturally gravitate towards activities that allow them to mimic adults and develop practical life skills. Present the button frame on a small tray or mat. After demonstrating, step back and allow your child to explore it at their own pace. This fosters concentration and independence. You'll find many ready-made options for practical life Montessori materials on SkilloToys.com if you prefer not to DIY.
Extending the Learning: Beyond Just Buttons
Once your child masters the button frame, they might enjoy other dressing frames like those for zippers, snaps, or buckles. These activities significantly contribute to their overall fine motor skills development. You can even try making frames for tying laces or velcro closures. The principles remain the same: isolate the skill, present it clearly, and allow the child to practice repeatedly.
Key Takeaways:
- A Montessori button frame aids children aged 2.5-4 in developing independence and fine motor skills.
- It's a practical life activity that isolates the skill of buttoning for focused learning.
- DIY button frames can be made using readily available, affordable materials from local Indian markets.
- The process of making and using the frame promotes concentration and self-confidence in children.
- Parents should present the frame gently and allow the child to practice at their own pace.
- This activity is a cornerstone for child development India, encouraging self-sufficiency.
FAQ:
Why is a button frame important for child development?
A button frame is crucial because it helps children develop essential fine motor skills, hand-eye coordination, and concentration. These skills are fundamental for various tasks beyond dressing, supporting overall cognitive and physical development in early childhood.
What age is suitable for a Montessori button frame?
Typically, a child is ready for a button frame between 2.5 and 4 years old. Readiness is more about their interest and ability to focus than a strict age, so observe your child's cues and fine motor dexterity.
Can I make other dressing frames at home?
Absolutely! The same principles can be applied to create frames for zippers, snaps, buckles, or even tying laces. These variations offer new challenges and further enhance your child's practical life skills and independence.
How often should my child use the button frame?
Children should be allowed to use the button frame whenever they show interest. The Montessori approach encourages repetition for mastery, so offering it as part of their accessible activities allows them to practice as much as they need, building confidence over time.
Creating a Montessori button frame is more than just a craft; it's an investment in your child's independence and self-confidence. We at SkilloToys.com believe in empowering parents with tools and knowledge to nurture their children's potential. Explore our full range of Montessori method learning materials and toys designed for holistic development.