Montessori Button Frame DIY: Dressing Practice at Home
In many Indian homes, watching our little ones grow from babbling toddlers to independent preschoolers is a journey filled with warmth and wonder. We often seek ways to nurture their natural curiosity and desire to 'do it myself.' One wonderful way to support this innate drive is through practical life activities, and a homemade Montessori button frame is an absolute gem for this.
It’s a simple yet incredibly effective tool that helps children master the art of dressing themselves, building confidence one button at a time. Imagine your child proudly buttoning their own shirt, a skill they learned right there at home!
What is a Montessori Button Frame and Why Does it Matter?
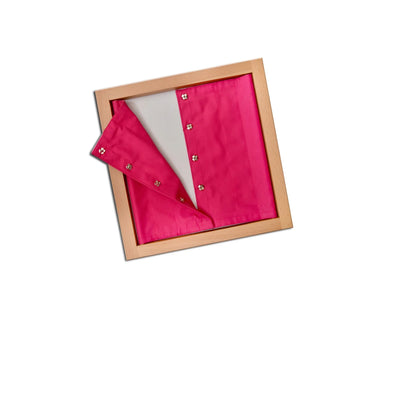
A Montessori button frame is a practical life material designed to help children develop fine motor skills, hand-eye coordination, and independence in dressing. This simple frame, typically made of two fabric panels that can be buttoned together, isolates the skill of buttoning from the complexities of putting on a garment. It works because it allows children to focus solely on the intricate movement of manipulating buttons and buttonholes without the distraction of a full piece of clothing.
Parents can introduce this activity to their toddlers and preschoolers, offering a focused, hands-on opportunity to practice an essential self-care skill.
Why a DIY Button Frame is Perfect for Indian Homes
Montessori principles, with their emphasis on independence and respect for the child, resonate deeply with traditional Indian values of self-reliance and contributing to the family. Creating a DIY button frame at home aligns perfectly with this ethos. It's an affordable, accessible way to bring Montessori learning right into your living room, whether you're in a bustling Bengaluru apartment or a spacious joint family home.
This simple 'educational toy' not only builds concentration and fine motor skills but also allows grandparents and older siblings to be part of the child's learning journey, offering gentle guidance and encouragement.
Benefits Beyond Buttoning
While the primary goal is buttoning, the learning extends much further. Using the button frame enhances a child's hand-eye coordination as they align the button with the hole, strengthens their pincer grasp, and develops patience. It fosters problem-solving skills as they learn to navigate the task and offers a profound sense of achievement. For more practical life essentials, explore our Montessori practical life materials.
Your Step-by-Step Guide to Making a DIY Button Frame
Creating your own Montessori button frame is a satisfying project. It doesn't require advanced crafting skills, just a bit of patience and a few common household items.
Gathering Your Materials (Local Sourcing!)
You’ll need:
- Two sturdy fabric pieces: Approximately 12x12 inches each. Old cotton sarees, durable dupattas, or even sturdy denim from an old pair of jeans work wonderfully! Ask your local tailor for fabric scraps – they often have beautiful pieces.
- Buttons: 4-6 buttons, varying in size (start with larger ones for easier grip).
- Matching thread and needle.
- Optional frame base: A piece of stiff cardboard, thin plywood, or even a sturdy old book cover (approx. 10x10 inches) to give it stability.
Simple Steps to Construct Your Frame
1. Prepare the Fabric: Hem all edges of your two fabric pieces for a neat finish. This prevents fraying and makes the frame more durable for repeated use by tiny hands.
2. Mark Button Placement: On one fabric piece, mark where you want to sew your buttons. Ensure they are spaced evenly, about 2-3 inches apart. On the second fabric piece, mark corresponding spots for the buttonholes.
3. Sew on Buttons: Securely sew the buttons onto the first fabric piece. Reinforce them well, as they will undergo a lot of tugging!
4. Create Buttonholes: For the second fabric piece, you can either machine-stitch buttonholes (if you have a sewing machine) or hand-sew them. Alternatively, if hand-sewing, you can create simple fabric loops instead of traditional buttonholes. Just ensure they are large enough for the buttons to pass through easily.
5. Assemble the Frame (Optional): If using a frame base, you can attach the fabric pieces to it. Simply glue or stitch the outer edges of the fabric pieces onto the cardboard or plywood base, leaving the inner edges free to be buttoned. This makes the frame more rigid and easier for a child to hold and manipulate, enhancing their experience with toys and games for fine motor skills.
Introducing the Button Frame to Your Child
Presenting any Montessori material, especially a new DIY one, requires a calm and deliberate approach. Sit with your child in a quiet space. Slowly and clearly demonstrate how to unbutton and then button each button, without speaking much. Let your actions do the teaching. Then, invite your child to try.
Remember, the goal is independence, not perfection. Allow them to explore at their own pace. This gentle introduction is key to successful Montessori method learning activities.
Tips for Encouraging Independence
As children engage with the button frame, they're not just learning to button; they're developing self-confidence. Resist the urge to fix their mistakes immediately. Allow them to problem-solve. Praise their effort and persistence, rather than just the outcome. This approach builds resilience and a love for learning, a cornerstone of successful Montessori at home India practices.
Extending the Learning
Once your child has mastered buttons, you can create similar DIY frames for other dressing skills: zippers, buckles, laces, or even snaps. These practical life skills are foundational for independence and contribute significantly to a child's self-esteem.
Key Takeaways for Your Montessori Button Frame
- A DIY Montessori button frame fosters fine motor skills and independence in dressing.
- It's a practical, affordable 'educational toy' perfectly suited for Indian homes and readily made with local materials.
- Present the frame with a slow, deliberate demonstration, allowing your child to explore independently.
- Focus on encouraging effort and persistence, embracing the Montessori principle of allowing the child to lead their learning.
- The skills gained extend beyond buttoning, building concentration, patience, and problem-solving abilities.
What age is best for a Montessori button frame?
Typically, children between 2.5 and 4 years old show a strong interest and readiness for the button frame. Observe your child for signs of interest in dressing themselves or manipulating small objects.
How often should my child use the button frame?
The button frame should be available to your child as part of their prepared environment. Allow them to choose when and how long they want to engage with it, respecting their natural concentration cycles.
Can I make other DIY practical life frames?
Absolutely! You can easily adapt the concept to create frames for zippers, buckles, snaps, or lacing. Using similar materials, these DIY activities reinforce various self-dressing skills at home.
What if my child isn't interested in the button frame?
If your child isn't interested, put the frame away for a few weeks and reintroduce it later. Children develop at their own pace, and sometimes they just aren't ready for a particular activity yet. Don't force it.
Are there other educational toys for toddlers that help with dressing?
Yes, many practical life materials focus on dressing skills. Look for lacing activities, buckling boards, and dressing dolls with various fasteners. These all help build the necessary dexterity and cognitive understanding for self-dressing.
Bringing Montessori home doesn't require elaborate setups; it's about thoughtful engagement and providing opportunities for growth. With a simple DIY button frame, you're not just teaching a skill, you're nurturing a capable, confident individual. Explore more such empowering learning tools at SkilloToys.com and support your child's developmental journey.