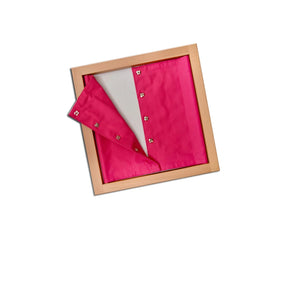
DIY Montessori Button Frame for Dressing Practice
As parents in India, we often cherish our children's independence, whether it's helping with small chores or dressing themselves. The Montessori philosophy strongly supports this journey, encouraging children to master practical life skills from an early age. Today, let's explore how to create a simple yet incredibly effective DIY Montessori button frame right at home, fostering independence and fine motor development.
Many of us grew up in homes where grandparents played a huge role in teaching us daily tasks. The button frame is a modern take on that nurturing guidance, allowing children to practice a crucial skill at their own pace. It's an ideal activity for toddlers and preschoolers, perfectly aligning with Montessori at home India principles.
What is a Montessori Button Frame?
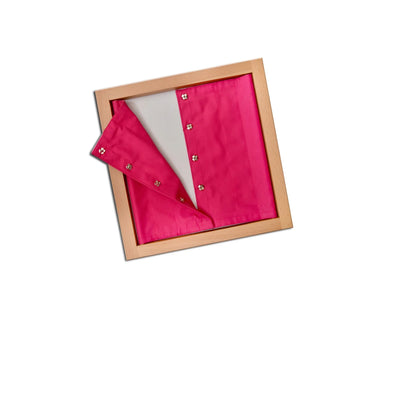
A Montessori button frame is a practical life material designed to help children practice buttoning and unbuttoning garments. This activity is more than just learning to fasten buttons; it refines fine motor skills, hand-eye coordination, and concentration, all while building self-confidence. It works because it isolates the specific skill of buttoning, allowing the child to focus without the distraction of a full garment. Parents can introduce this frame as part of their child's daily routine, turning a challenging task into an engaging play activity.
In the Montessori classroom, children encounter a series of dressing frames, each isolating a different fastening skill like zippers, snaps, or buckles. The button frame is often one of the first introduced, laying a strong foundation for independent dressing. It’s a wonderful example of how educational toys can support child development India has embraced.
Gathering Your Materials: An Indian Home Approach
Creating your own button frame doesn't require a trip to a specialty store; you can likely find most items around your home or at a local tailor's shop (darzi). This DIY approach is not only cost-effective but also a fantastic way to involve older siblings or even grandparents in a fun project!
Here’s what you’ll need:
- Two sturdy pieces of fabric: Old denim jeans, thick cotton, or even a repurposed saree pallu can work perfectly. Choose fabrics that don't fray easily. Each piece should be roughly 10x12 inches (or slightly larger, depending on button size).
- A sturdy base: Two pieces of thick cardboard, plywood, or even strong laminated placemats, slightly larger than your fabric pieces.
- Buttons: A set of 4-6 large, easy-to-grasp buttons. Consider traditional shell buttons or colourful plastic ones found at local haberdashery stores.
- Thread and needle: Strong sewing thread that matches your fabric or buttons.
- Fabric glue or strong adhesive: For attaching fabric to the base.
- Scissors: For cutting fabric.
Step-by-Step: Crafting Your Button Frame
This project is straightforward and can be completed in an afternoon, perhaps with a cup of chai in hand!
-
Prepare Your Fabric: Cut your two fabric pieces to the same size (e.g., 10x12 inches). On one piece, mark positions for your buttons evenly spaced along one of the longer edges. On the second piece, mark corresponding positions for buttonholes. Remember to leave a small seam allowance if you plan to hem the edges for a neater finish.
-
Sewing the Buttons: Securely sew the buttons onto the first piece of fabric. Ensure they are sewn very tightly to withstand repeated use by tiny hands. Using double thread will add extra durability.
-
Creating Buttonholes: For the second piece of fabric, you have a few options for buttonholes. If you have a sewing machine with a buttonhole function, that’s ideal. Otherwise, you can hand-stitch buttonholes or even create simple slits and reinforce them with strong stitching around the edges. Make sure the buttonholes are slightly larger than your buttons for easy practice but not so large that the buttons slip out.
-
Assembling the Frame: Now, take your two base pieces (cardboard or plywood). Lay one fabric piece (with buttons) on one base and the other fabric piece (with buttonholes) on the second base. Ensure the buttoned edge of one fabric piece aligns perfectly with the buttonhole edge of the other when placed side-by-side. Securely glue the fabrics to their respective bases.
-
Joining the Halves: Once the glue is dry, bring the two fabric-covered bases together. They should meet perfectly along the buttoned and buttonholed edges. You can join them permanently by gluing them onto a third, slightly larger piece of cardboard, or create a flexible hinge using strong fabric tape on the back. A flexible hinge allows the frame to be folded, which is handy for small apartments or carrying it when visiting relatives.
Presenting the Button Frame to Your Child
The presentation of any Montessori material is key. Introduce the DIY Montessori button frame with enthusiasm, but without pressure. Show your child how to use it slowly and deliberately, breaking down the action: hold the button, push it through, pull it out. Repeat this a few times, then invite them to try. Remember, the goal is not perfection, but the process of learning and self-discovery.
This activity builds foundational fine motor skills crucial for writing, drawing, and other daily tasks. It’s a wonderful addition to any collection of Montessori learning activities at home, encouraging focus and persistence. For other enriching Montessori method learning materials and toys, you can explore SkilloToys.com.
Key Takeaways for Parents
- A DIY Montessori button frame empowers children with self-dressing skills.
- It significantly enhances fine motor skills, hand-eye coordination, and concentration.
- Materials can be easily sourced from around an Indian home or local shops.
- The activity promotes independence, a core Montessori principle.
- Present the frame slowly and deliberately, allowing the child to explore at their own pace.
- This practical life exercise is perfect for children aged 2.5 to 6 years.
FAQs about the Montessori Button Frame
What age is appropriate for a Montessori button frame?
The button frame is generally suitable for children aged 2.5 to 6 years. Start with larger buttons and progress to smaller ones as your child's fine motor skills develop. Observation is key to introducing it at the right moment.
How does the button frame help with child development?
It strengthens finger muscles, improves dexterity, and refines the pincer grasp, all vital for writing and other detailed tasks. Beyond physical skills, it fosters independence, problem-solving, and sustained concentration, contributing positively to overall child development India parents value.
Can I make other DIY dressing frames?
Absolutely! Once your child masters buttons, you can apply the same DIY principles to create frames for zippers, snaps, buckles, or even shoelaces. This provides a progressive series of challenges, keeping their interest engaged.
What if my child isn't interested in the button frame?
Children learn best when they are genuinely interested. If your child shows no interest, simply put the frame away and reintroduce it after a few weeks or months. Never force the activity, as it can create a negative association with learning. Offer it as one of many engaging educational toys.
Crafting a DIY Montessori button frame is a fulfilling project that brings the essence of Montessori education into your home. It’s about more than just buttons; it’s about nurturing a confident, capable, and independent little individual. Explore SkilloToys.com for a wide range of thoughtfully designed Montessori materials to support your child's unique learning journey.