Make a Montessori Button Frame for Dressing Practice
In our bustling Indian homes, where little hands are always eager to help, encouraging independence from an early age is a gift. Think about those moments when your child tries to put on their own kurta or tries to button their shirt – it’s a wonderful display of their developing will! The Montessori philosophy beautifully embraces this natural drive, and today, we're going to explore how you can easily create a simple yet profound learning tool: a Montessori button frame, perfect for dressing practice at home.
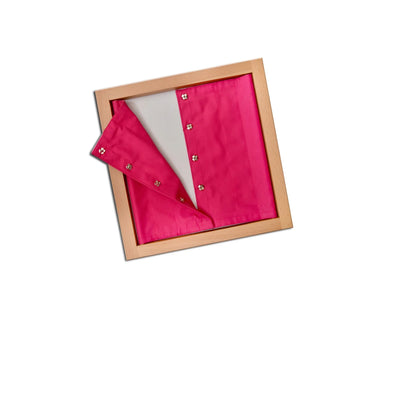
A Montessori button frame is a practical life material designed to help children develop fine motor skills, hand-eye coordination, and independence in dressing. This simple frame typically features two fabric panels joined by a row of buttons and buttonholes, allowing a child to practice the precise movements required for buttoning and unbuttoning. This works because it isolates the specific skill of buttoning, allowing the child to master it without the added complexities of clothing. Parents can present this frame as an inviting activity, empowering their child to learn at their own pace.
Why a Button Frame for Indian Homes?
Life in India, especially in joint families or smaller apartments, often means a rich, shared environment. For parents exploring Montessori at home India, incorporating practical life activities like a button frame fits beautifully. It doesn't require much space, can be made with readily available materials, and directly supports the child's natural desire to 'do it myself,' whether it's for their school uniform or a festive outfit.
These frames offer a quiet, focused activity amidst the usual family energy. Mastering buttoning builds confidence, a crucial aspect of child development India. Imagine your little one proudly buttoning their shirt before a family pooja or a visit to their grandparents – these small victories are huge for their self-esteem.
Gathering Your Materials: A Desi Touch
Creating your own Montessori button frame is wonderfully simple and budget-friendly. You can easily find most items at your local tailor shop, haberdashery, or even repurpose materials from around the house. Think sustainable and smart!
- Fabric: Two pieces of sturdy fabric (e.g., old denim, thick cotton, canvas) measuring about 12x12 inches each. Choose contrasting colours for visual appeal.
- Buttons: 4-6 medium-sized buttons (about 1-inch diameter). Larger buttons are easier for beginners.
- Thread: Strong sewing thread matching your fabric or buttons.
- Needle: A sewing needle.
- Scissors: Fabric scissors.
- Cardboard/Plywood (Optional): Two pieces, slightly smaller than your fabric, to give the frame rigidity.
- Adhesive (Optional): Fabric glue or strong craft glue if using cardboard/plywood.
Step-by-Step: Crafting Your Own Button Frame
- Prepare the Fabric: Take one fabric piece and fold it in half lengthwise. Iron the crease. This will be your button panel. Repeat with the second fabric piece for the buttonhole panel.
- Mark Button Placement: On one fabric panel (let’s call it Panel A), measure and mark where you want your buttons to be. Space them evenly, about 2-3 inches apart down the centre fold.
- Sew the Buttons: Neatly sew the buttons onto Panel A at your marked spots. Ensure they are very secure, as children will be pulling on them.
- Mark Buttonholes: On the second fabric panel (Panel B), align it perfectly with Panel A. Mark the corresponding spots for the buttonholes, making sure they will line up with the buttons when the fabric is folded.
- Create Buttonholes: Carefully cut vertical slits at your marked buttonhole spots. These slits should be just slightly larger than your buttons. Hand-stitch or machine-stitch around each buttonhole to prevent fraying and make them durable.
- Assemble the Frame (Optional): If using cardboard or plywood, glue one piece of cardboard to the back of Panel A and another to the back of Panel B. This adds structure.
- Join the Panels: Place the two fabric panels side-by-side, ensuring the button side and buttonhole side are facing inwards when folded. Stitch the long outer edges of the two panels together securely. This creates the 'frame' effect.
Integrating the Button Frame into Daily Play
Once your button frame is ready, introduce it to your child with a calm and inviting demeanour. Show them how to use it slowly, without words, demonstrating the precise actions of buttoning and unbuttoning. Place it on a low shelf or in their designated work area alongside other practical life Montessori materials.
Remember, the goal is independence, not perfection. Let them experiment, make mistakes, and discover at their own pace. This activity not only hones fine motor skills, which are crucial for writing later, but also develops concentration and a sense of accomplishment. It's a fantastic example of Montessori learning activities that empower children.
Beyond button frames, many educational toys for toddlers focus on similar skill development. Look for items that involve zipping, lacing, snapping, or buckling. These activities prepare children for real-life tasks, helping them become capable and confident individuals.
Maria Montessori believed in preparing the child for life. A button frame, made with love and local resources, is a beautiful step in that direction, fostering self-reliance from an early age. It’s part of a holistic approach to learning that many Indian parents are embracing to support their child's natural growth.
Key Takeaways
- A DIY Montessori button frame helps children master buttoning skills independently.
- It develops essential fine motor skills, hand-eye coordination, and concentration.
- This practical life activity fosters a sense of accomplishment and self-reliance.
- Materials can be easily sourced locally, making it a budget-friendly and sustainable project for Indian homes.
- Present the activity calmly, allowing the child to learn through self-correction and exploration.
- It's a foundational step in preparing children for self-dressing and broader life skills.
FAQs about the Montessori Button Frame
What age is appropriate for a Montessori button frame?
Typically, children between 2.5 and 4 years old are ready for the button frame. Observe your child's interest in dressing themselves and their developing pincer grasp to gauge their readiness.
How do I introduce the button frame to my child?
Present it with a calm, wordless demonstration. Sit beside your child, slowly and deliberately showing them how to unbutton and then button, allowing them to observe. Then, invite them to try.
Can I use different types of fastenings on a DIY frame?
Absolutely! Once your child masters buttons, you can create similar frames for zippers, snaps, buckles, or even laces. This diversification enhances their practical life skills further.
What if my child loses interest quickly?
If a child loses interest, it might be too challenging, or they may simply not be ready yet. Put the frame away for a few weeks or months and reintroduce it later. Never force the activity.
We hope this guide inspires you to create a wonderful learning tool for your child! At SkilloToys.com, we believe in supporting every child's developmental journey with thoughtfully designed resources. Explore our full range of Montessori method learning materials to complement your home learning environment.